-
Preparation
The end result of roof installation is influenced by the preparation. Good preparation will make the job of roof installation safe and easy.
-
Safety
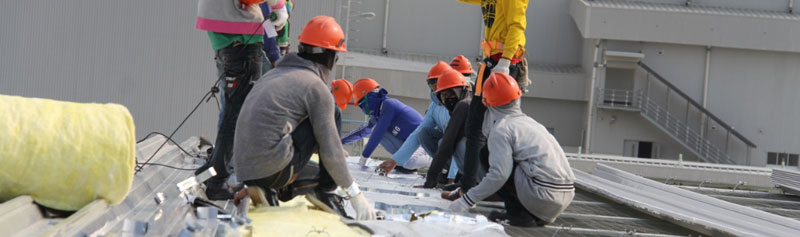
Safety is very important in roof installation. It is the job at height, open-air, and exposed to wind, rain, heat, and lightning. For maximum safety measures, use proper equipment such as safety net, safety helmet, body harness, gloves, sunglasses, and non-slippery footwear. Wear full body cover to prevent sun heat. Never do the installation under the rain, strong wind, or lighting.
-
Wind Direction
Determine the wind direction during the rainy season. The roof should be installed against the wind direction.
-
Roof Frame
Make sure that the roof frame is well painted and cleaned from dirt spots, bulges, and remaining objects from the previous works that could be harmful to the roof sheet.
-
Fastener
Make sure to use the galvanized or chromed coating screws to fasten the roof. Use the screws with rubber made of the washer to prevent the screw from scratching the roof. And make sure that the washer diameter is bigger than the screw head.
-
Installation Process
Step One
Lift up and put the roof sheets on the roof frames piled and tied. Keep the lower and upper ribs side of roof sheets facing the same direction. The weight of every pile of roof sheets laid on the roof frames must not exceed the roof frame load capacity and ply in accordance to the required quantity of the column or section.
Step Two
The air circulation monitor section is the start point of installation for building equipped with this facility and the gutter section must be finished prior to roof installation.
The first roof sheet is laid on where its upper rib is at the edge of the building and the lower rib is at the other side. The second roof sheet is laid on at the side of the first roof sheet where its upper rib overlaps the lower rib of the first roof sheets and so on for the next roof sheets.
For large buildings, some joins of roof sheets might be needed to extend for the length of the roof sheets. To avoid workers stepping on the installed roof, the installation should follow the procedure, i.e. after row A is filled up, then row B, C, and so on until all the rows are filled up evenly on the same day. Workers are commonly prohibited to step on and walk on the installed roof during the installation of the next roof sheets.
-
Walking on Roof
Some roof profile types allow workers to step on and walk along the installed roof. The worker could walk on the peaks of the small corrugated types, such as G680 and C710, with a minimum base material thickness of 0.45 mm, where they have to step on three peaks of the corrugated sheet at the same time. While for the bigger profile type, such as BL600, SF750, and SF650, with a minimum base material thickness of 0.45 mm, worker cold walk on along the valley of profiles.
-
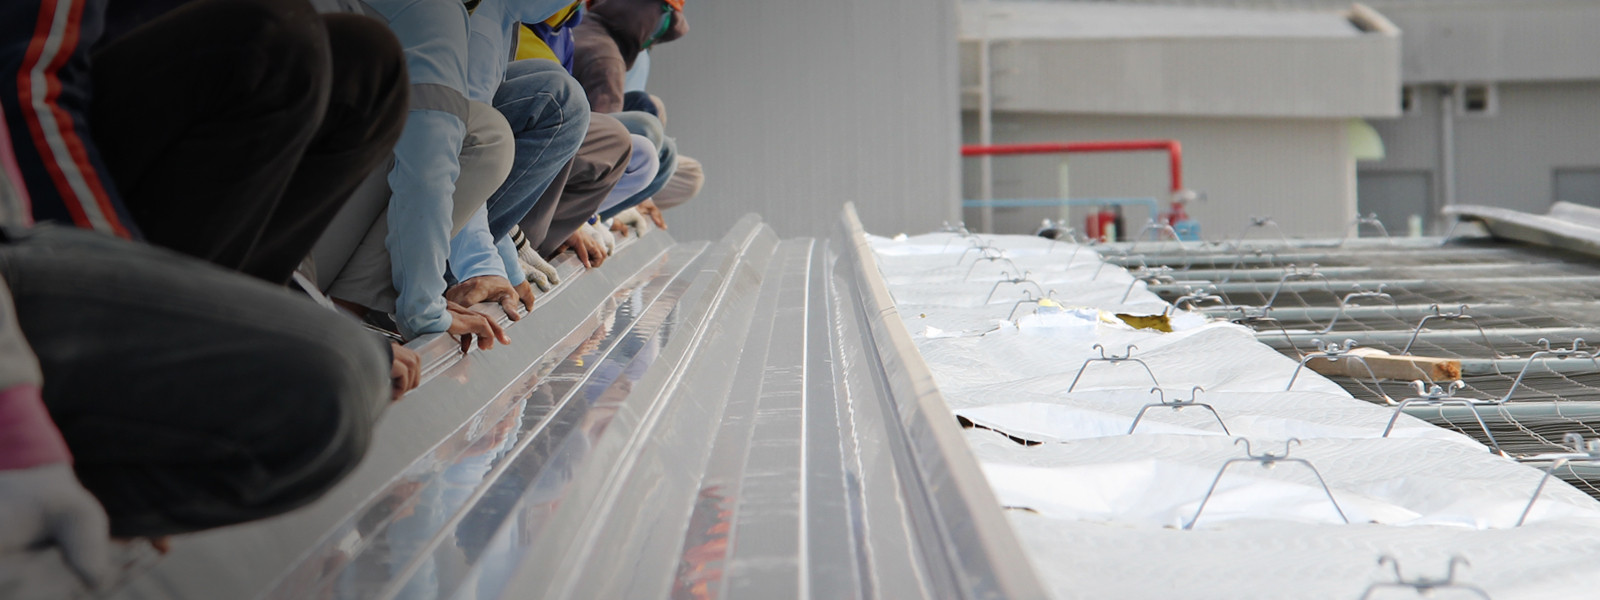
Joint
The width direction joint of the corrugated roofing sheets need only one wave of overlap, while the length direction joining need overlap of 200 mm. If the roof angle is less than 5°, the joining need overlaps of 300 mm and leakproof sealant is required.
-
Drilling Holes
An electric drill or screwdriver is needed to make holes for fastener and screws. The steel chips residue from the drilling should be cleaned immediately as it may cause rust stain on the roof surface. Chisel or nail is not recommended to make holes as it may lead to roof leaks and further damage in the future.
PT FUMIRA - Installation & Storage
Installation & Storage
Installation
Siding
Compodeck
-
Installation at Steel Construction
Put the Compodeck panel at the steel beam and adjust the position so that the end panel is overlapped with the steel beam at minimum of 50 mm. The end of panel can be welded to the steel beam at maximum distance of 340 mm for every weld point across the panel width.


-
Installation at Concrete Beam Construction
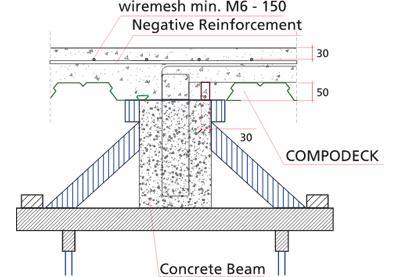
Put the Compodeck panel at the concrete beam and adjust the position so that the end panel is overlapped with the concrete beam at minimum of 30 mm. If the concrete construction is a T beam, then the panel is put as a single span which ends are supported by the beams.But if the concrete beams have been made, anchors are inserted in the beams to support the panel as a long contiunuous span.


-
Installation at Masonry Wall Construction
Put the Compodeck panel at the "rollag" and adjust the position so that the end panel is overlapped with the "rollag" at minimum of 70 mm width. The end of the panel can be fastened to the "rollag" using anchors or concrete nail.

-
Concreting
Temporary supports are needed to prevent the Compodeck panel from deflection during concreting until the curing is finished. The concrete must have a minimum compressive strength of 210 kg/cm2 or 21 Mpa after 28 days of concreting. Any additivie in the concrete must not contain elements that harmful to the galvanized sheet. It is recommended to use ready mixed concrete for the concreting.
Important:
Spread the concrete during the concreting to avoid an excessive load at one point due to the accumulation of the concrete.
The secondary reinforcement bars are placed at about 20 mm from the surface of the Compodeck panel and the concrete must be thoroughly compact between the bars until the required slab thickness is evenly reached.
The backside of the Compodeck panel profile can be exposed as the decorative ceiling barely or painted with attractive color (ColorDeck). Ceiling sheet material can be attached to the back side of CompoDeck panel using anchors which are placed before the concreting or hangers which are placed at the ribs of the panel.
-
Installation
The optimal Compodeck panel length are two to three spans distance in one sheet. The gap between the ends of panel should be as small as possible. Along the overlapped sides of panels should be fastened in every 500 mm using a 5 mm diameter of rivet or self drilling screw (10 x 16 mm, S point hexagonal or water head). The shear connector to hold the lateral load should have a maximum diameter of 20 mm and height of 40 mm.
